

On this page
You've finished a dealership walkaround, and the car looks ready for its listing. Then you pause the video as the camera rounds the rear bumper: the license plate is readable, even though it seemed harmless during playback. Learning how to blur a license plate in video means more than adding an effect. You need a mask that follows the plate, survives export, and holds up when someone examines individual frames.
Table of Contents
- Why Plates Need Blurring Before You Publish
- How to Blur a Plate in Video Step by Step
- Choosing a Blur Style That Survives Motion
- How to Confirm the Plate Stays Unreadable
- Common Problems and How to Fix Them
- Pick Your Blurring Route for Your Next Batch
Why Plates Need Blurring Before You Publish
Cover every license plate throughout the exported video, then check the whole timeline before publishing. A blur that works on the opening frame doesn't protect a plate that appears later as the vehicle turns.
This applies to dealership listing videos, lot tours beside public roads, drone footage of parking lots, and doorbell or dashcam clips shared with neighbors. If you're sending footage to police as evidence, preserve the untouched original and follow their submission instructions rather than overwriting it.
Google's Street View privacy guidance states that its system automatically blurs identifiable faces and license plates. The useful publishing principle is straightforward: remove unnecessary identifying detail before distribution, not after someone spots it online.
Two easy-to-miss failures deserve attention:
- Brief exposure: The plate becomes visible during a turn, even though most of the clip shows only the vehicle's side.
- Paused-frame readability: Motion makes the characters difficult to notice, but a viewer can read them after pausing.
A private archive has less exposure than a public listing, but blurring isn't a universal statement about legal requirements. Check local law and the destination platform's rules before publishing. Our guide to why license plates need blurring provides additional context for dealership media.
Start by listing the clips you intend to publish and marking every clip that contains a plate, including background vehicles.
How to Blur a Plate in Video Step by Step
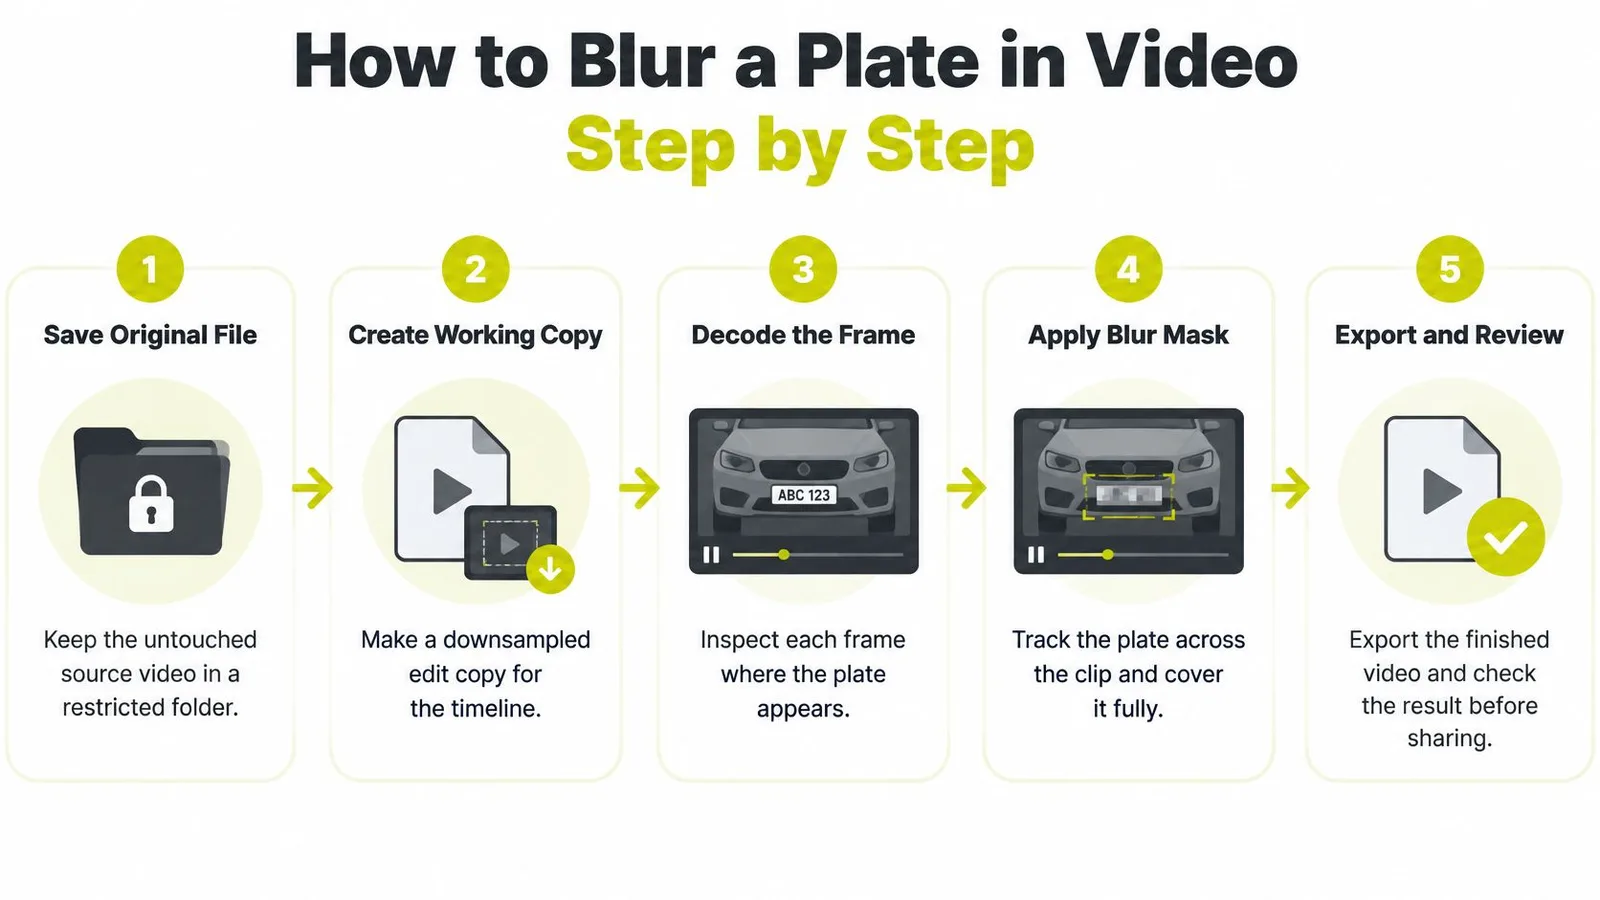
Use a detection, tracking, and rendering workflow, not a collection of disconnected blurred stills. Detection locates the plate; tracking carries its position through movement; rendering permanently applies the covering effect to the delivered video.
Keep this sequence beside your editing timeline.
Build the track before rendering
Protect the original and create a working copy. Store the untouched file in a restricted folder, then create a downsampled proxy for responsive editing. Keep the source and proxy clearly labeled so nobody accidentally publishes the unedited source.
Inspect frames sequentially and detect plates. In an automated workflow, decode the MP4 in order, resize frames for the detector, and process every frame unless you've validated a less frequent detection interval. Scanning only the opening image misses vehicles that enter later and plates revealed during camera movement.
Remove duplicate detections. Apply non-maximum suppression, which keeps the best overlapping detection for a plate instead of treating competing boxes as separate objects. Without this cleanup, the system may create redundant masks or unstable tracks.
Associate detections across adjacent frames. Give each plate a persistent track so its mask follows position, scale, and perspective changes. Trigger fresh detection when confidence drops or the track is lost rather than letting the box coast over the bumper.
Expand the tracked coverage. Add a safety margin around the plate instead of matching its border exactly. Set that margin using the sizing guidance below, with particular attention to corners exposed during turns.
Render against the full-resolution original. Map proxy coordinates back to the original frame dimensions, apply the covering effect, and encode the finished MP4. A frequent mistake is reviewing a blurred proxy while exporting a clean source with the effect disabled or incorrectly scaled.
Verify the delivered file. Open the exported MP4 in a separate player and complete a timeline review before sharing it. A correct-looking editor preview isn't proof that the export used the intended mask.
A published real-time anonymization system uses sequential frame reading, preprocessing, YOLO inference, non-maximum suppression, and postprocessing. That's a useful engineering model, but it doesn't remove the need to inspect dealership footage with different lighting, distances, and plate designs.
Use editor tracking when automation isn't available
In Adobe Premiere Pro or DaVinci Resolve, place a masked effect over the plate and use the available tracking controls. Scrub the result and add manual position, scale, and shape keyframes wherever the tracker stops matching the plate, especially as the car turns.
You don't need detector-specific cleanup when you're drawing and tracking the mask manually. You still need continuous coverage, including separate masks for other vehicles.
Finished-frame standard: Hide the plate while leaving the bodywork, badges, wheels, and headlights useful to the buyer.
Set the mask style and padding before your final render. This demonstration can help you follow the editing sequence visually.
Choosing a Blur Style That Survives Motion
I'd use a solid opaque mask for public exports and reserve Gaussian blur for internal previews. Blur can retain character shapes and edges; a fully opaque covering removes the underlying plate detail from the rendered region.
A replacement graphic can achieve the same coverage while looking more intentional. It must be opaque throughout its footprint, without transparent lettering, cutouts, or an uncovered border.
Blur styles compared for vehicle video
| Mask style | Recognition risk | Effect on the vehicle | Best use |
|---|---|---|---|
| Strong Gaussian blur | Medium: edges and shapes can survive | Soft, keeps the body shape | Internal previews only |
| Coarse pixelation | Medium: block grid can reveal character spacing | Blocky, draws the eye | Fast edits with a tight box and careful review |
| Solid opaque box | Low within the fully covered area | Clean, obvious mask | Public listing and walkaround exports |
| Replacement graphic | Low when fully opaque and correctly tracked | Looks like a finished vehicle | Premium listings with a consistent look |
These are practical risk comparisons, not measured guarantees. Any style fails if the mask leaves the plate exposed.
Size the mask for movement
Use roughly 10–25% of the detected box's width and height as a starting expansion, consistent with the working guidance associated with the FANVID video-anonymization benchmark. Inspect how your editor applies expansion: increasing the total box dimensions isn't the same as adding that amount to each side.
Padding should extend beyond every plate edge. A tight rectangle may look polished while the camera is stationary, then expose a corner when perspective changes.
Say you're filming a pickup with a tow hitch beside the rear plate. You may need extra coverage on the turning side without covering the hitch, trim, or bumper contour unnecessarily. Animate the mask's shape rather than making the entire covering oversized.
Choose the smallest mask that remains safely outside the plate throughout its movement, not the smallest mask that looks good while paused.
For dealership walkaround videos, that balance matters because buyers still need to assess the vehicle's appearance. If an effect hides a large section of the tailgate, refine its geometry rather than weakening its opacity.
Don't treat failed optical character recognition, or OCR, as proof of privacy. Recognition can exploit surviving structure across adjacent frames, and a human reviewer may read characters that a particular OCR tool misses.
How to Confirm the Plate Stays Unreadable
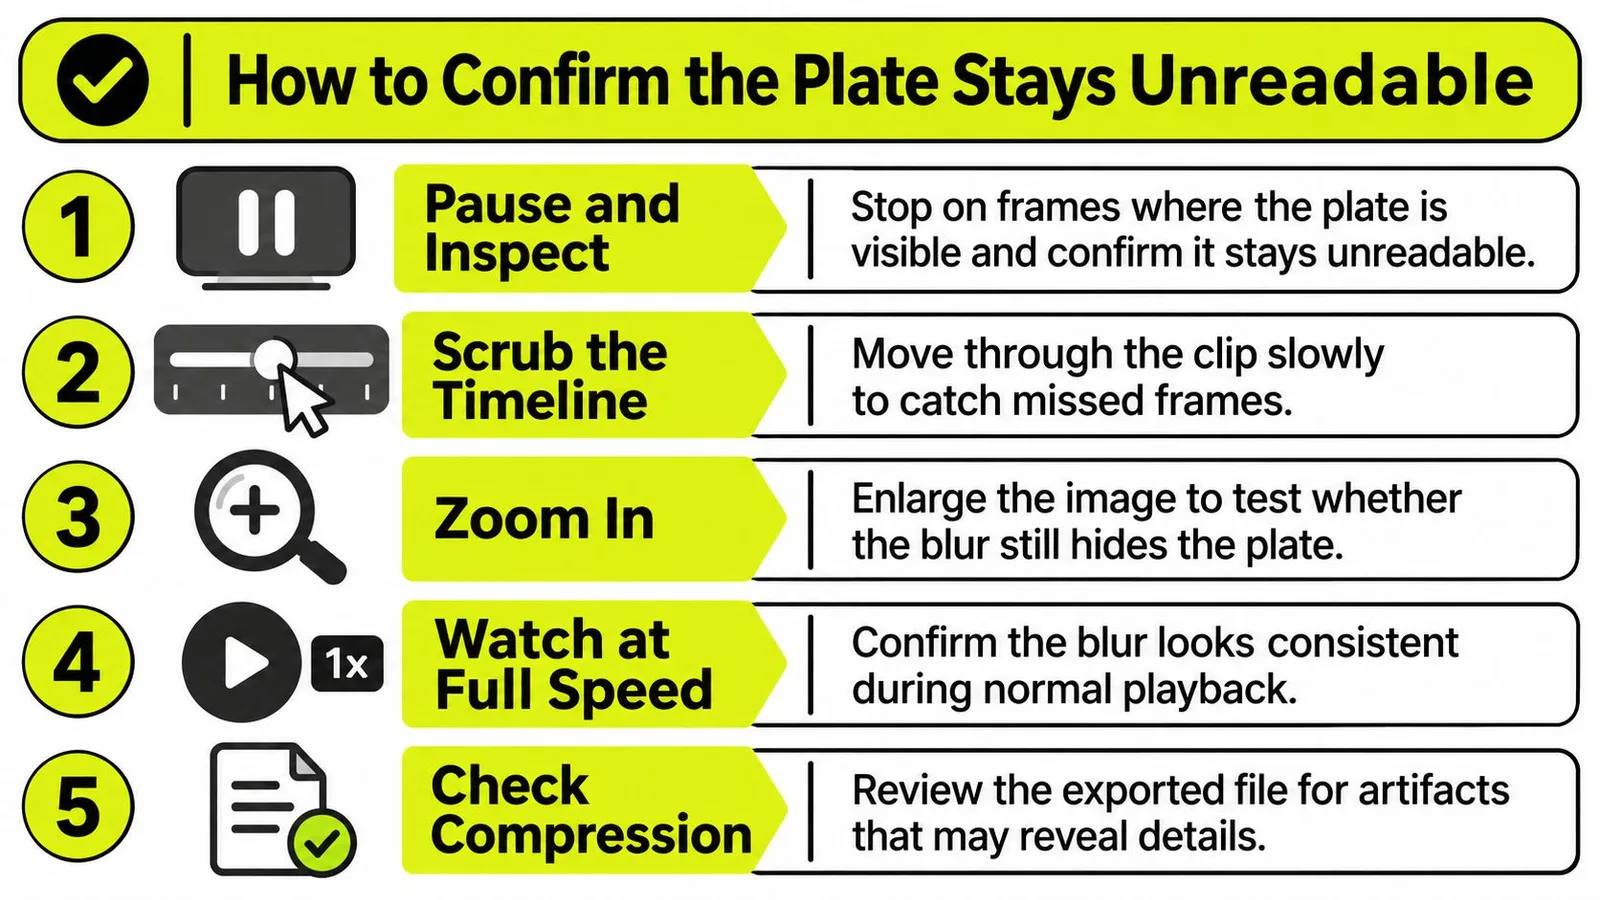
A mask can look convincing at full speed and still fail when a viewer pauses, enlarges the picture, or scrubs through a turn. Verify the exported file, not just the editing project.
The practical question raised in this drone-video plate-blurring discussion is familiar: placing an effect is only part of the job. Establishing whether it stays over the plate requires a separate inspection process.
Use a fixed review checklist rather than relying on a quick final glance.
Run the export through a release check
- Watch at normal speed: Check for disappearing masks, visible jumps, and plates on background vehicles.
- Inspect track endpoints: Step through the first and last visible frames of each plate, including partial appearances at the image boundary.
- Examine difficult movement: Review turns, rapid pans, zooms, and transitions frame by frame. Pay particular attention when something passes in front of the plate and the tracker reacquires it.
- Inspect reflective surfaces: Look for plate images in glass, glossy paint, and nearby vehicles, not just the primary plate location.
- Extract frames for closer inspection: Enlarge samples from across each track and have another reviewer attempt to read them. OCR can supplement this check, but it shouldn't replace human inspection.
- Record failures explicitly: Mark frames containing legible characters and reject the export if a plate remains readable. Fix partial character exposure too, rather than accepting it because the complete registration isn't obvious.
Sampling helps locate problems, but sampling alone doesn't establish whole-timeline coverage. For a strict release standard, examine the remaining plate-visible frames as well, using frame extraction or a review player that supports sequential stepping.
Check the actual distribution version
After a re-encode, bitrate change, or platform upload, inspect the resulting version again. Compression won't restore pixels replaced by an opaque box, but it can change the appearance of a weak blur or make an existing coverage problem harder to notice.
Record the filename, review result, and reviewer's sign-off together. If the uploaded version fails, replace it before distributing the listing link.
Release rule: Pass the whole timeline, not the thumbnail.
Common Problems and How to Fix Them
A flickering mask is an obvious warning after an initial render. Don't hide the flicker with a transition or stronger blur; identify whether the box jumps, the effect switches off, or the tracker loses the plate.
The time-consuming failures are often tracking drift during a turn and a mismatch between preview and export. Both need a targeted correction before another render.
Blurring symptoms, causes and fixes
| Symptom | Likely cause | Fix |
|---|---|---|
| Mask disappears for a few frames | Tracker lost the plate during a fast pan | Force fresh detection, widen the track margin, and re-render the affected range |
| Mask flickers or jumps between frames | Box positions aren't smoothed between detector runs | Interpolate box positions or add closely spaced manual keyframes |
| Plate readable in export but not in editor | Weak blur, proxy mismatch, or an effect omitted from export | Re-render from the original resolution, confirm effects are enabled, and inspect the MP4 |
| Mask drifts off the plate during a turn | Angle and scale change faster than the tracker follows | Add manual keyframes at the turn and enlarge coverage for that segment |
| Vehicle looks unrecognizable | Mask covers too much surrounding bodywork | Shrink coverage to the plate plus safety margin; retain opaque coverage |
| Plate visible in a reflection | Paint or glass mirrors the plate | Add a separately tracked mask over the reflection |
| Detector misses a distant plate | Plate is small or its design is unfamiliar | Run higher-resolution detection or mask the visible range manually |
Repair the track rather than chasing it
When a mask drifts, return to the last correctly aligned frame. Split the tracking segment there, reacquire the plate, and add keyframes around the turn's position and scale changes.
Don't stretch a failed track across an occlusion. Start another segment when the plate reappears, making sure the returning edge is covered immediately.
For export mismatches, confirm that proxy scaling, effect visibility, and source relinking are correct. Increasing bitrate won't fix an effect that never reached the output.
Lowering detector confidence alone isn't a reliable answer for distant plates. It can add false detections without recovering the missed object; try higher-resolution processing or manual coverage instead.
Any mask correction requires another full verification pass, not merely a replay of the frames you edited.
Pick Your Blurring Route for Your Next Batch
A stationary plate in a short clip is usually a manual-mask job. A recurring batch of dealership walkarounds needs a repeatable detection and tracking process with a named reviewer, not a fresh editing experiment for every vehicle.
Choose the route according to how the plate moves and how often you publish.
Blurring route by situation
| Situation | Route | Why it fits |
|---|---|---|
| One clip, plate stays in one position | Manual mask in a video editor | Fast, with no detector setup needed |
| One clip, plate moves through turns | Motion tracking with manual keyframes | Keeps coverage aligned through perspective changes |
| Weekly batch of walkarounds | Automated detection with frame-by-frame review | Makes processing repeatable across many clips |
| Still listing photos from the same lot | Photo plate blur tool, then a manual check | Suitable for stills, without motion tracking |
For accompanying photos, our free license plate blur tool accepts uploaded photos with no signup. Plates are hidden through an edit, not blurred automatically, so request the change and inspect each result; this photo workflow doesn't replace tracking in moving footage.
Set a shared release standard
Test your chosen video route on a representative clip before applying it to the batch. Use footage with a turn, a background vehicle, and changing light rather than selecting only the easiest stationary shot.
Record these items in the team checklist:
- Route and owner: Name the editing method and the person responsible for the export.
- Mask settings: Specify the style, padding percentage, and permitted manual adjustments.
- Release approval: Record the reviewed filename and verification sign-off.
A consistent workflow for video for car dealers should cover privacy checks as deliberately as framing and presentation. Staff shouldn't have to guess whether a soft blur is acceptable.
Today, open the most recent video you plan to publish and run the verification checklist on its exported file.
CarShots offers dealership photo tools and walkaround videos, plus a free, no-signup license plate blur tool for uploaded photos. Visit CarShots to prepare the still images accompanying your listing, and keep a separate tracking and export-review workflow for plates in filmed video.
- blur license plate
- license plate blurring
- video privacy
- video redaction
- dealership video