

On this page
You're preparing a used sedan for its listing, and the photos don't quite match the car outside. The paint looks darker, neighboring vehicles crowd the frame, and the license plate is readable. Beside it on the same website sits an otherwise identical sedan photographed against a clean backdrop in even light. Before you edit yours to compete, ask a more useful question: will the shopper recognize this exact car when they arrive?
Table of Contents
- What Automotive Photo Editing Covers and Why It Matters
- Which Photos Shoppers Need to See
- Core Adjustments and What Each One Fixes
- How to Edit a Vehicle Photo Step by Step
- Fixing Background Swaps and Editing Defects
- Keeping a Whole Lot Consistent
- Choose an Editing Workflow for Your Lot
What Automotive Photo Editing Covers and Why It Matters
Automotive photo editing is the work done after capture to make vehicle photographs accurate, readable, and comparable across inventory. That includes correcting exposure, balancing color, cleaning up backgrounds, treating license plates, and preparing files for publication. It shouldn't include inventing equipment, changing paint, or concealing wear.
Think of editing as arranging a store window. The vehicle is the product, and the photograph is the display that helps someone judge it. Cleaning the window improves the view; changing what's behind it misrepresents the merchandise.
The difference between an untreated capture and a considered edit is easiest to judge side by side.
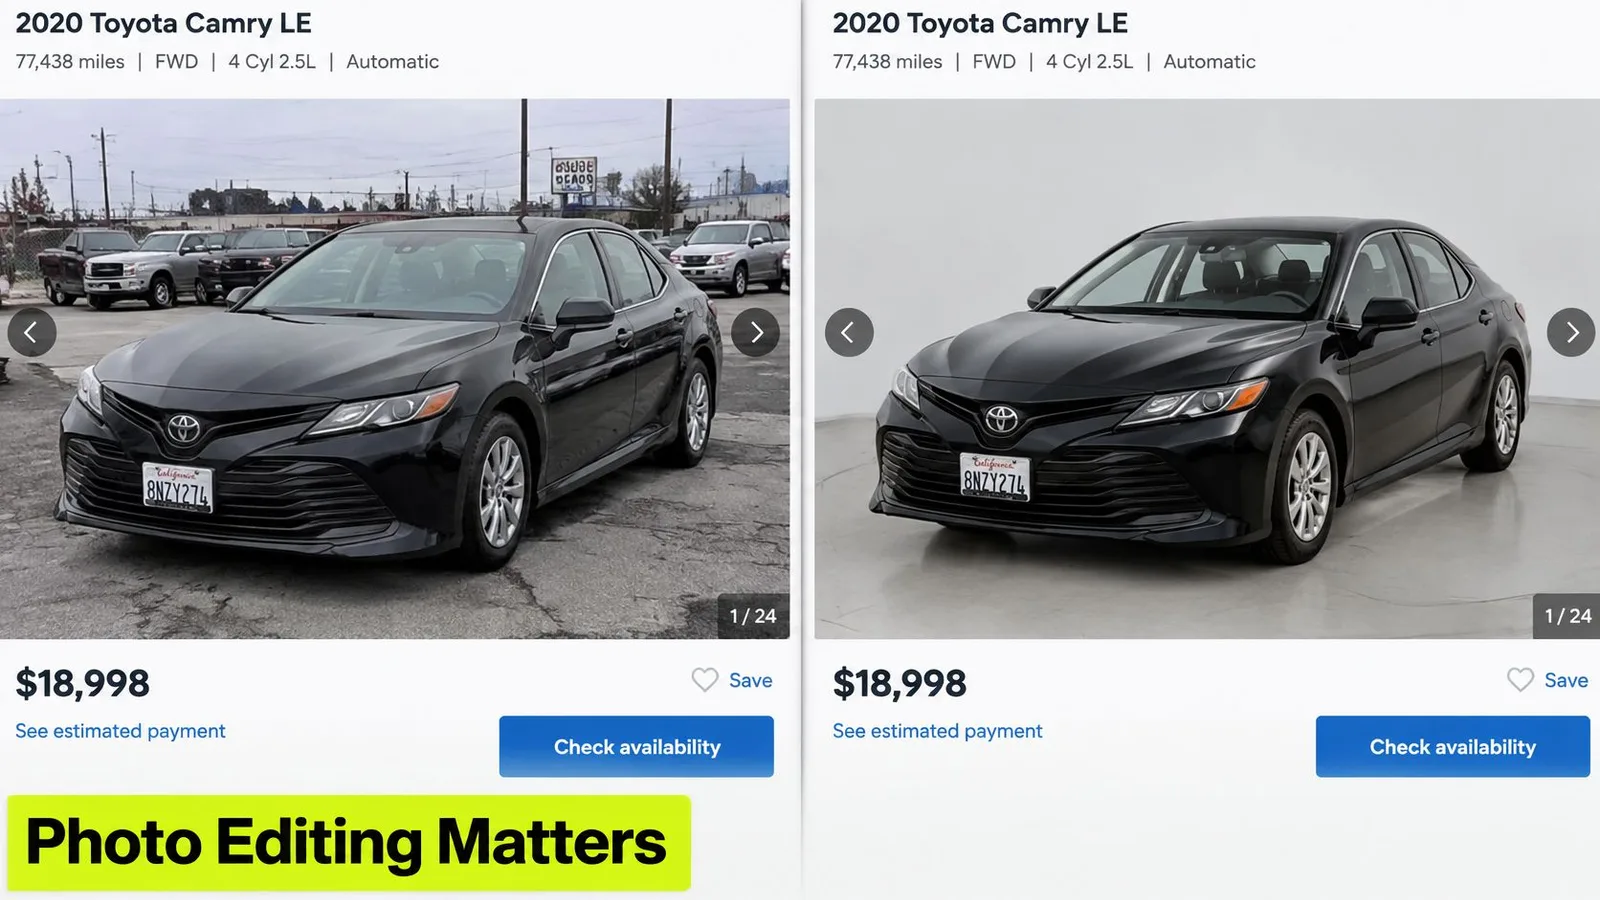
For the sedan in the cluttered lot, useful editing means revealing the actual paint tone and separating the body from distracting surroundings. A brighter finish isn't automatically a better result. If the edit makes charcoal paint look silver, it has failed even if the thumbnail attracts attention.
In Cox Automotive's 2018 Power of Pictures analysis, used-vehicle listings with multiple custom photos received 245% more vehicle-detail-page views than listings without photos, and multiple custom photos outperformed stock photography by 349% for used vehicles. Those findings concern listing engagement, not proof that a particular editing technique causes a sale.
The recognition test: Improve the shopper's view of the vehicle, not the vehicle they think they're buying.
A repeatable editing standard makes that distinction practical. Staff can follow the same rules for framing, brightness, and presentation while preserving the details that make each individual car different.
Which Photos Shoppers Need to See
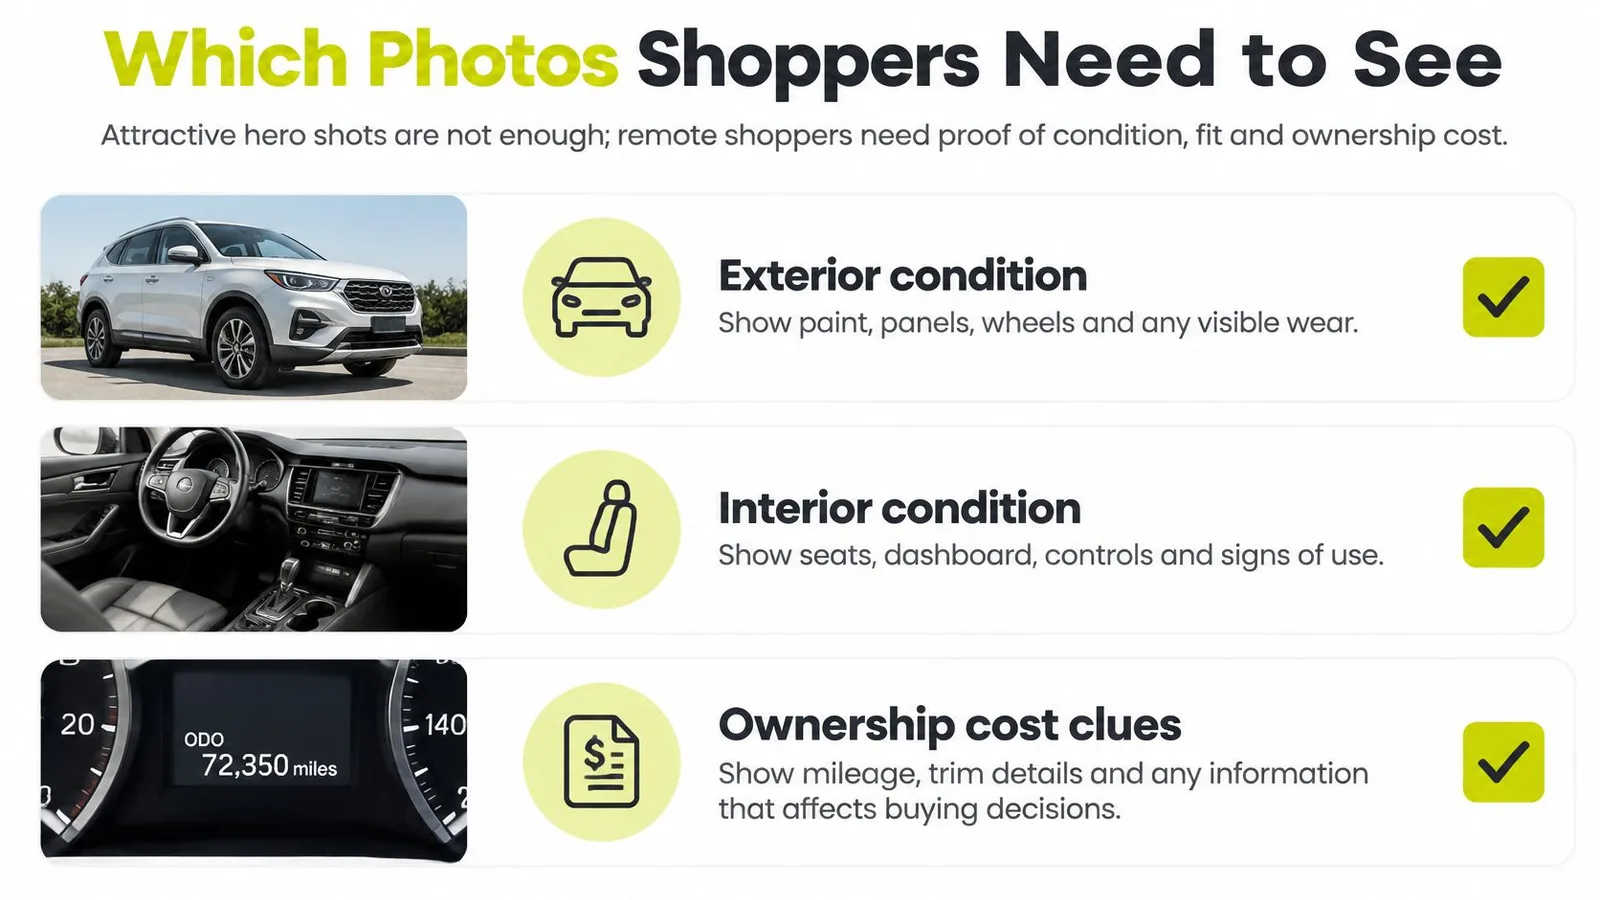
An attractive exterior photograph helps introduce a car. A remote shopper also needs evidence: Can passengers sit comfortably? What does the upholstery look like? What equipment comes with it, and where is the wear?
The Dealer.com guide to real vehicle photography reports that four out of five tested shoppers preferred high-resolution photos and full-screen galleries for inspecting details. Give shoppers useful detail rather than filling the gallery with near-identical exterior views.
Use these categories to check whether the gallery answers practical buying questions.
Build an inspection sequence
Start with exterior coverage using a repeatable vehicle photography angle sequence, then move through the spaces and details a buyer would inspect in person.
- Driver's position: Show the seat, steering wheel, controls, and sightlines without stretching the cabin.
- Passenger space: Show rear-seat legroom with the front seat in a representative position.
- Powered-on dashboard: Capture the odometer, infotainment display, and warning-light state. Distinguish an ignition check from the vehicle's running state.
- Cargo and equipment: Show the load area, included accessories, and charging equipment where relevant.
- Condition details: Include tires, wheels, upholstery wear, panel damage, and every material blemish.
A close-up needs context. Pair a scratch detail with a wider view showing which panel it belongs to, rather than leaving shoppers to guess its location.
Make the gallery usable
Keep image order predictable, and write descriptive captions or alt text that identify the view and relevant visible details. Export enough resolution for mobile zooming, but don't use extreme wide-angle stretching to make rear seats or cargo areas seem larger.
Use the video as an additional view, not a substitute for inspectable still photographs.
Keep material marks visible. A shopper who discovers an edited-out seat tear won't distinguish between an enthusiastic retoucher and a misleading seller. A complete, consistent inspection gallery is more useful than a larger collection of cinematic exterior shots.
Core Adjustments and What Each One Fixes
Each adjustment should solve a visible problem. Before moving a slider, name that problem: the door is too dark to inspect, the silver paint has a blue cast, or a sign distracts from the roofline.
Assess exposure and white balance first because they affect every later judgment. Lot lighting can push neutral surfaces toward yellow, blue, or green. Use a known neutral reference rather than assuming that a reflected patch of sky should look gray.
Core automotive photo adjustments
| Adjustment | What It Fixes | Target | Risk if Overdone |
|---|---|---|---|
| Exposure and brightness | Dark or blown-out lot shots | Even midtones with no clipped white paint | Washed-out paint and lost detail |
| White balance | Yellow, blue, or green lighting casts | Neutral whites and grays | Paint shifts away from its real color |
| Color and saturation | Dull or overly vivid paint | Paint matches the physical car | Cartoon-like, misleading finish |
| Contrast and shadows | Flat images that obscure trim and glass | Detail in black trim and tire sidewalls | Crushed blacks and halos |
| Background replacement | Cluttered lots and distracting signage | Clean backdrop matched to the light | Car appears to float |
| License plate treatment | Readable plate numbers | Plate blurred or covered | Treatment conceals adjacent damage |
| Straighten and crop | Tilted horizon and clipped bumpers | Level horizon and full vehicle | Cut-off panels or distorted proportions |
| Noise and sharpening | Low-light grain and soft edges | Crisp edges with natural texture | Plastic-looking paint and halos |
| Dust and clutter removal | Lot debris, people, and distracting reflections | Clear surroundings and truthful surfaces | Removal of marks visible during inspection |
Judge detail rather than drama
Set saturation against the actual paint, not an appealing preset. Red shouldn't become fluorescent, and metallic silver should retain its subtle tonal changes. In Lightroom or another editor with a histogram, check whether bright body panels have become featureless white areas.
Contrast needs similar restraint. Deepening black trim can make an image look punchier while concealing scuffs, cracks, or tire detail. Lift dark areas only far enough to inspect them without making the underside look artificially illuminated.
Plate treatment and cropping are local presentation decisions, not opportunities to reshape the vehicle. Keep the plate surround and nearby bumper visible, and don't stretch the frame to fit a template.
Finally, distinguish removable distractions from vehicle condition. Pick up litter before shooting; retain stone chips afterward. Run through the table before saving, checking that every adjustment has a clear purpose and hasn't erased useful evidence.
How to Edit a Vehicle Photo Step by Step
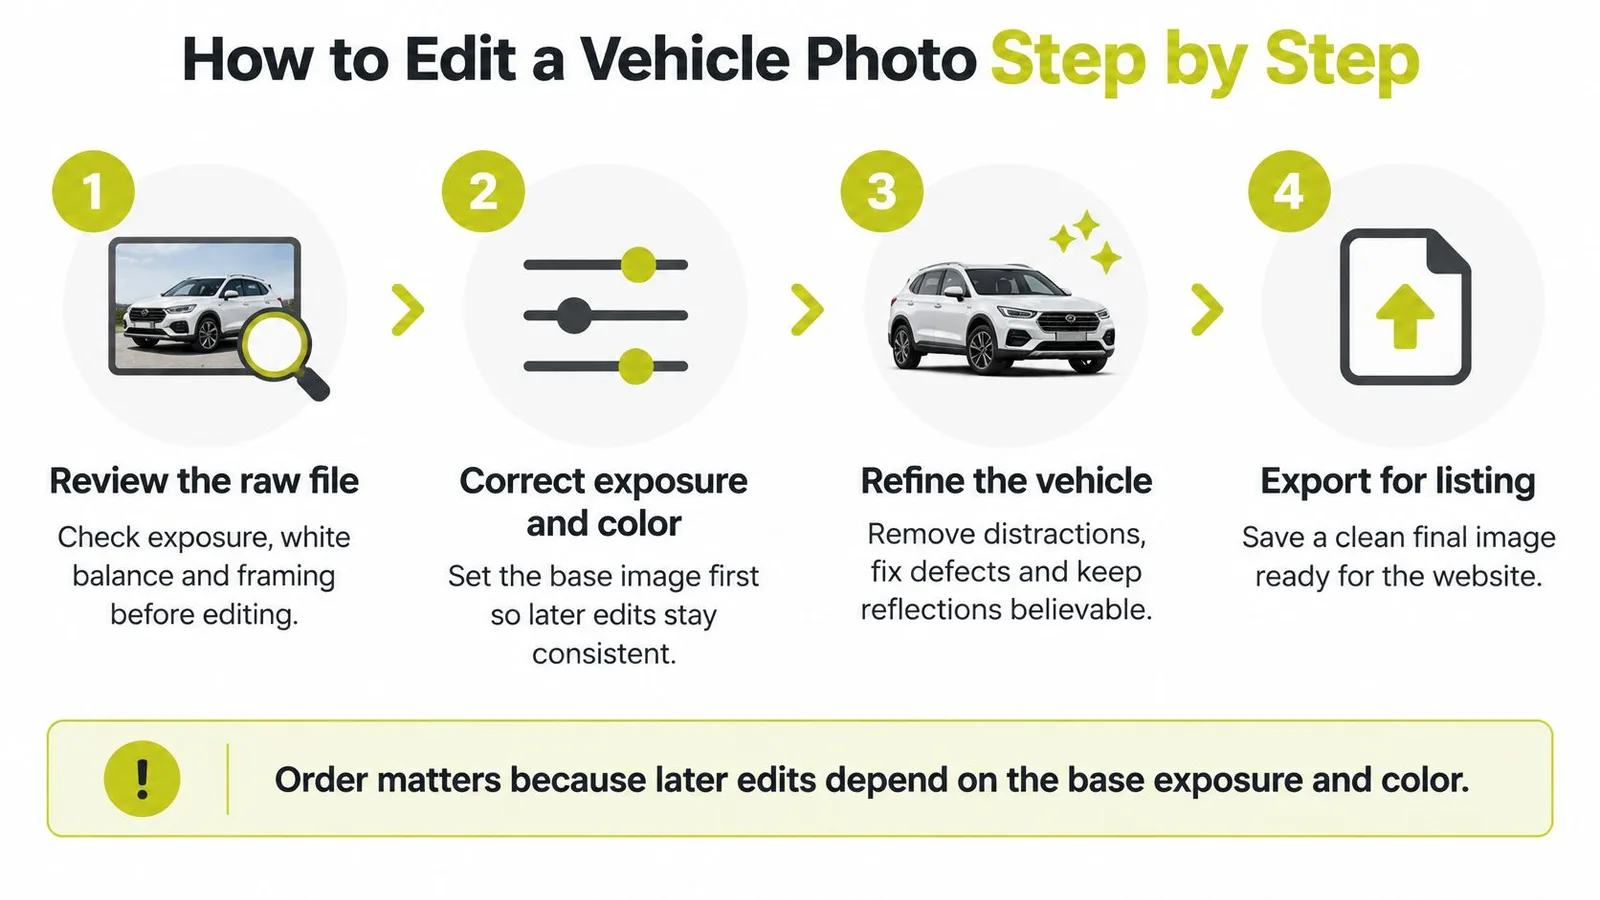
Order matters because later edits depend on the base exposure and color. Work on a copy of the original, keeping the source file available for comparison whenever an adjustment starts to look questionable.
This overview groups the work into capture review, correction, refinement, and delivery.
Establish the base image
Review the original at full screen. Reject frames where glare conceals a panel, a shadowed side can't be evaluated, or a person blocks the vehicle. Don't spend time trying to reconstruct information the camera never captured; reshoot instead.
Correct white balance. Use a gray card or another known neutral area photographed under the same light, then verify the result against the vehicle. Don't sample tinted glass, chrome reflecting the sky, or an unknown shade of upholstery as though it were neutral.
Adjust exposure and contrast. Recover highlight detail on the paint and open shadows enough to inspect trim and wheels. Watch for the common slip of brightening the whole image to fix one dark area, which can wash out the roof and hood.
Level and crop. Straighten the horizon, retain the complete vehicle, and leave consistent breathing room around bumpers and mirrors. Use lens correction where appropriate, but don't force perspective changes that alter wheel shape or body proportions.
Refine and deliver
Clean or replace the background. Remove surroundings that compete with the vehicle, then inspect its connection to the ground and the remaining reflections. A tidy backdrop doesn't justify changing badges, trim, glass, or panel edges.
Blur or cover the license plate. Extend the treatment beyond the plate's edges so characters don't remain readable at the corners. Keep the edit localized so it doesn't cover a cracked surround or bumper damage.
Apply restrained noise reduction and sharpening. Inspect at 100% zoom, looking for natural paint texture and clean edges around mirrors and trim. Stop before smoothing removes surface detail or sharpening creates bright outlines.
Export to the inventory standard. Match the batch's dimensions and color profile, using sRGB for web delivery unless the receiving system specifies otherwise. Check the exported file rather than assuming the editor preview represents the final upload.
You can also begin an edit with a plain-language instruction, such as “hide the license plate” or “make it a little brighter.” The request describes the task; the original photograph remains the reference for approving it.
Our delivery process supports individual photo downloads, a whole-car ZIP, or distribution through a CSV or XML inventory feed or SFTP upload configured in settings. Before publishing, review the complete vehicle set in order and confirm that the delivered files retain the intended sequence and appearance.
Fixing Background Swaps and Editing Defects
A background swap can resemble a car cutout pasted onto a postcard. The outline might be precise, yet the result still looks wrong because the vehicle's light, perspective, and ground contact disagree with its new setting.
Build a believable composite in stages. Mask carefully around mirrors, glass, wheel spokes, roof rails, and antennae. Then estimate the original light direction from body highlights and ground shadows before choosing a background with compatible perspective, horizon, color temperature, and shadow softness.
Cox Automotive's photography guidance recommends neutral backgrounds, good lighting, and avoiding direct sunlight or objects that cast hard shadows. A neutral setting should make the car easier to evaluate, as this example illustrates.
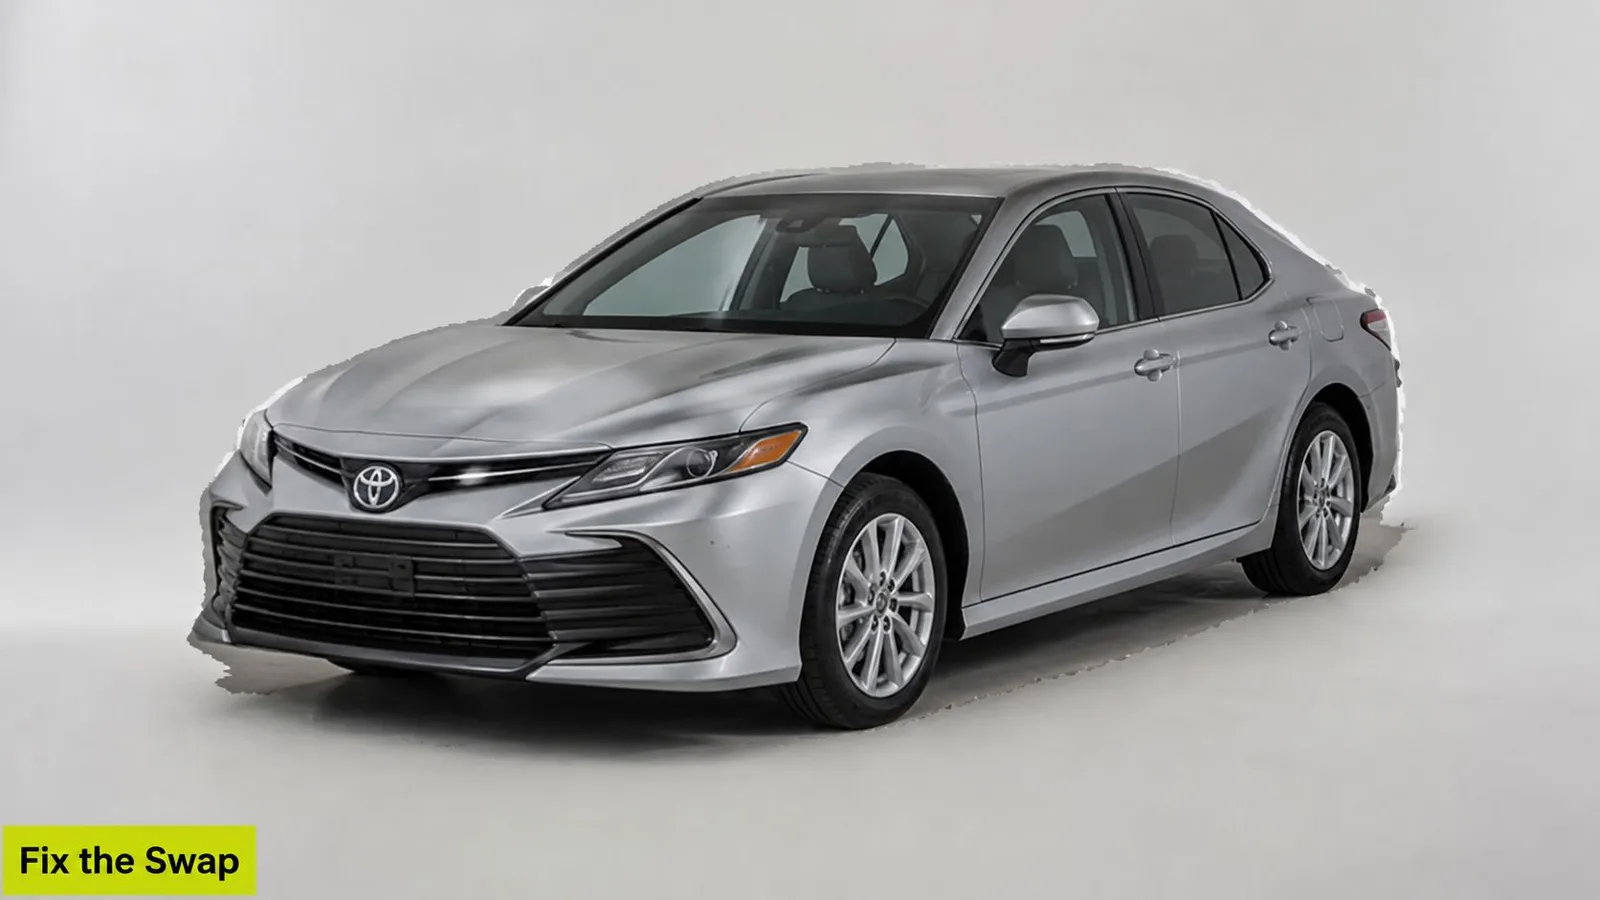
Repair the composite without rebuilding the car
Anchor contact shadows beneath the tires and chassis, not evenly around the vehicle's silhouette. Preserve believable environmental reflections on paint and glass; removing every reflection makes curved surfaces look flat rather than clean.
Editing defects, causes and fixes
| Symptom | Likely Cause | Fix |
|---|---|---|
| Halo around roof, mirrors, or spokes | Edge mask too tight or loose | Refine at 100% zoom and feather by one or two pixels where appropriate |
| Car looks pasted onto background | Shadows and horizon disagree with lighting | Anchor tire shadows and match horizon and light direction |
| Paint differs between photos | Inconsistent white balance | Apply a shared neutral reference to images under matching light |
| Clipped white or black areas | Exposure pushed too far | Reduce highlights and lift shadows gradually; reshoot unrecoverable areas |
| Wheels or glass look warped | Wide-angle distortion or aggressive transformation | Correct the lens profile; reshoot from farther away if needed |
| Plate partly visible | Blur area smaller than plate | Expand treatment beyond every plate edge |
| Ghost reflections in glass | Reflected people, lot, or photographer | Reshoot from another angle, or mask only the distraction without inventing obscured details |
| Muddy grain in shadows | Heavy noise reduction or high ISO | Reduce smoothing and retain natural texture |
Halos deserve an early check because they can reveal a careless cutout immediately. Feathering should soften a transition, not erase a thin antenna or turn chrome into a gray smear.
Check what the shopper will recognize
In CDK Global's dealership-website research, 88% of respondents who began their purchase journey online said vehicle pictures encouraged them to take the next step. Treat that next step as an invitation to verify the photograph against the car, not permission to embellish it.
A replacement background can be fictional. The vehicle's visible condition cannot.
Finish with a full-screen inspection for pixelation, haloing, missing trim, implausible reflections, and adjacent photographs with conflicting paint colors. If a repair requires guessing what lies beneath glare or an obstruction, take another photograph.
Keeping a Whole Lot Consistent
Start with a fixed shot list for each body style. Sedans should follow the same exterior and cabin sequence, while SUVs need their own cargo and seating coverage. Staff shouldn't have to invent the gallery every time another vehicle arrives.
Write the backdrop choice, camera height, shooting position, and framing reference on a card at the photography area. Mark repeatable positions on the ground where practical, but allow enough distance for longer vehicles without cropping their bumpers.
Standardize the handoff
- Capture conditions: Keep a neutral reference for each lighting batch. Start a new reference when the light changes rather than forcing one correction onto unrelated sessions.
- Export settings: Save a shared preset for dimensions, file format, and color profile.
- File order: Use a vehicle identifier and ordered shot names so uploads preserve the intended sequence.
- Approval ownership: Assign someone to check the finished listing, not just the files in the editor.
A written same-background vehicle photography standard helps employees reproduce the chosen presentation without relying on memory. Include a reference image that shows acceptable vehicle scale and margins.
Batch check: Compare neighboring gallery images. A sedan shouldn't appear to change shade or grow larger when the shopper advances to the next angle.
Reshoot replacement views under matching conditions when possible instead of mixing old photographs with a new session. Check several published listings side by side regularly, including on a phone, to catch gradual changes in staff framing, export settings, and background placement.
Choose an Editing Workflow for Your Lot
Choose around your operation rather than the most impressive demonstration image. Ask how many vehicles arrive each week, who captures them, and who has time to approve the finished galleries. The practical bottleneck might be photographer availability, editing skill, or getting files published correctly.
Editing workflows compared
| Workflow | Setup | Skill Needed | Consistency | Best Fit |
|---|---|---|---|---|
| Studio booth with DSLR and lighting | Dedicated space and equipment | High | Strongest control when well run | Large groups with a dedicated photographer |
| Phone capture with desktop editor | Phone, tripod, editing software | Medium | Requires staff discipline | Small lots with one trained editor |
| Outsourced editing service | Raw files sent to an external editor | Low in-house editing skill | High with a precise brief | Dealers without spare editing time |
| Phone capture with AI-assisted editing | Phone with browser or app | Low editing skill | High with guided outlines and review | Lots where several staff shoot in-house |
Match the method to the team
A small lot with a capable editor may prefer phone capture and desktop software because one person can control the finished look. A group with dedicated space and photographers can justify a booth for repeatable capture conditions. Neither arrangement removes the need to inspect vehicle details.
Outsourcing moves editing work outside the dealership, but your staff still need to supply usable photographs and approve the results. Compare the entire dealership photography cost, including staff handling and corrections, rather than comparing editing charges alone.
CarShots is a guided, phone-based option: our on-screen outlines help staff position each car, and you can photograph vehicles on the lot and get studio-quality photos back in about a minute. The Monthly plan costs $50 for 333 photos, about 15¢ a photo, with a Car Page for every car.
Before committing to a workflow, photograph a complete vehicle using the inspection sequence. Edit the set, publish a test gallery, and compare it beside a current listing on desktop and mobile. Scale the method only when staff can reproduce it without altering the car's identity or hiding its condition.
CarShots turns phone photographs into standardized listing images with background, lighting, color, and license plate editing. Visit CarShots to try your first car free, with up to 10 photos and no card required, then check the results against the vehicle before publishing.
- automotive photo editing
- car photo editing
- vehicle photography
- dealership listing photos
- car listing images